

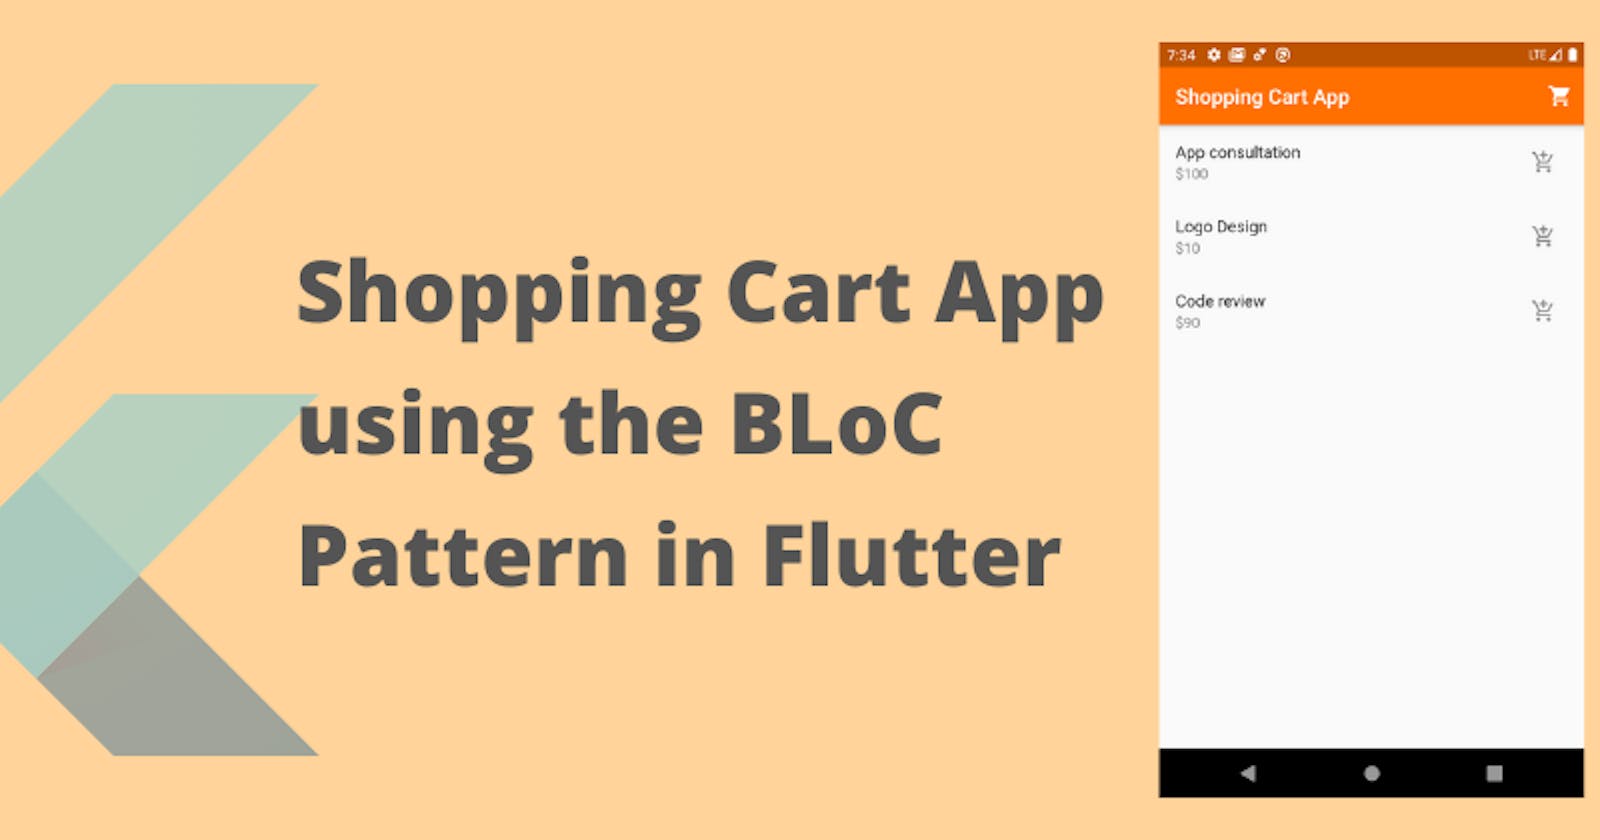


The BLoC pattern in flutter is a matured way to manage state in a Flutter app. In this tutorial, we'd be building a simple shopping cart app which uses the BLoC pattern. Here's the final app:

Before you proceed
- I wrote the code on Flutter version 1.12.13+hotfix.9
- I used VsCode for this tutorial. You can use whatever you've been using. I'm certain you'd follow. You can get all the code from my GitHub repo
- I don't assume you have in-depth knowledge of Flutter. You can follow along if you are a beginner. Though I assume you have heard of Flutter and what it offers.
Set up
Create a new Flutter project by running (ensure you choose a package name).
flutter create --org com.choose_a_package_name shopping_cart_app
You can choose to ignore the --org com.choose_a_package_name. Choosing a package name when creating the project ensures you don't go through the hassle of changing it in several places if you want to change it in the future.
Here's our folder structure to guide you.
lib
│ main.dart
└───bloc
│   │   cart_items_block.dart
└───pages
    │   checkout.dart
    │   shop_items.dart
Clean up the main.dart file in the lib folder. Then copy and paste this block
import 'package:flutter/material.dart';

void main() => runApp(App());

class App extends StatelessWidget {
  @override
  Widget build(BuildContext context) {
    return MaterialApp(
      initialRoute: '/',
      routes: {
        '/': (BuildContext context) => ShopItems(),
        '/checkout': (BuildContext context) => Checkout()
      },
    );
  }
}
We haven't imported the ItemsList and Checkout Widgets yet so, we'd get a linting error. Let's fix that.
import 'package:flutter/material.dart';
import 'package:shopping_cart_app/pages/checkout.dart';
import 'package:shopping_cart_app/pages/shop_items.dart';

void main() => runApp(App());

...
We still don't have anything in those files. Let's add the basic classes.
Create the pages
In your lib folder, create a pages folder and create two files
- shop_items.dart
- checkout.dart
Paste this snippet in shop_items.dart
import 'package:flutter/material.dart';

class ShopItems extends StatelessWidget {
  Widget build(BuildContext context) {
    return Scaffold(
      appBar: AppBar(
        title: Text('Shopping Cart App'),
        actions: <Widget>[
          IconButton(
            icon: Icon(Icons.shopping_cart),
            onPressed: () => Navigator.pushNamed(context, '/checkout'),
          )
        ],
      ),
      body: ShopItemsWidget(),
    );
  }
}

class ShopItemsWidget extends StatelessWidget {
  Widget build(BuildContext context) {
    return Center(child: Text("All items in shop have been taken"));
  }
}
And now for the checkout.dart
import 'package:flutter/material.dart';

class Checkout extends StatelessWidget {
  Widget build(BuildContext context) {
    return Scaffold(
      appBar: AppBar(title: Text('Checkout')),
      body:  Center(child: Text("You haven't taken any item yet"))
    );
  }
}
Now, that all pressing errors have been fixed, let's finish up the main.dart file. Now is also a good time to run your app if you haven't already. Navigate to the main.dart file and click on fn key and f5. It runs your code in automatically whenever there's a change (essentially a debug mode) as opposed to running flutter run in the terminal.
import 'package:shopping_cart_app/pages/checkout.dart';
import 'package:shopping_cart_app/pages/shop_items.dart';
import 'package:flutter/material.dart';

void main() => runApp(App());

class App extends StatelessWidget {
  @override
  Widget build(BuildContext context) {
    Map<int, Color> color = {
      50: Color.fromRGBO(255, 144, 0, .1),
      100: Color.fromRGBO(255, 144, 0, .2),
      200: Color.fromRGBO(255, 144, 0, .3),
      300: Color.fromRGBO(255, 144, 0, .4),
      400: Color.fromRGBO(255, 144, 0, .5),
      500: Color.fromRGBO(255, 144, 0, .6),
      600: Color.fromRGBO(255, 144, 0, .7),
      700: Color.fromRGBO(255, 144, 0, .8),
      800: Color.fromRGBO(255, 144, 0, .9),
      900: Color.fromRGBO(255, 144, 0, 1),
    };
    return MaterialApp(
      theme: ThemeData(
        primarySwatch: MaterialColor(0xFFFF7000, color),
      ),
      initialRoute: '/',
      routes: {
        '/': (BuildContext context) => ShopItems(),
        '/checkout': (BuildContext context) => Checkout()
      },
    );
  }
}
A little note about BLoC pattern
The BLoC (Business Logic Component) pattern is implemented by having
- One or several BLoC classes which:
- contain data (or communicate with models which in turn contain data) and
- sets up Streams for continuous data deliver especially when the data changes.
- These streams receive data from sinks. Sink => Stream. Sinks are kept in sync with the current data object.
- Widgets subscribe to the BLoCs using StreamBuilders. The widget becomes a child of the StreamBuilder. The Streambuilder rebuilds the widget when the BLoC's data changes (i.e. the stream receives new data).
In a nutshell, we deal with BLoC classes (Sinks and Streams) and StreamBuilders.
Building out our BLoC class
We'd implement the BLoC for our shop and cart.
- The shop models a literal shop where you pick stuff up.
- The cart models a literal trolley you put stuff in.
Paste this block into the cart_items_bloc.dart file.
/// The [dart:async] is necessary for using streams
import 'dart:async';

class CartItemsBloc {
  /// The [cartStreamController] is an object of the StreamController class
  /// .broadcast enables the stream to be read in multiple screens of our app
  final cartStreamController = StreamController.broadcast();

  /// The [getStream] getter would be used to expose our stream to other classes
  Stream get getStream => cartStreamController.stream;

  /// The [allItems] Map would hold all the data this bloc provides
  final Map allItems = {};

  /// The [dispose] method is used
  /// to automatically close the stream when the widget is removed from the widget tree
  void dispose() {
    cartStreamController.close(); // close our StreamController
  }
}
This is the basic structure of our BLoC. All our data will be stored in the allItems map. When our data is modified, we would add the modified map to the cartStreamController sink.
Now, let's add data to our Map object. In the same file, locate the allItems Map.
...
Stream get getStream => cartStreamController.stream;

/// The [allItems] Map would hold all the data this bloc provides
final Map allItems = {
  'shop items': [
    {'name': 'App dev kit', 'price': 20, 'id': 1},
    {'name': 'App consultation', 'price': 100, 'id': 2},
    {'name': 'Logo Design', 'price': 10, 'id': 3},
    {'name': 'Code review', 'price': 90, 'id': 4},
  ],
  'cart items': []
};
...
I manually assigned ids to the object. In a real app, you'd want to use a package like uuid.
Now, we'd implement methods for modifying the data in the allItems Map. We'd add
- An
addToCartmethod for adding items from the shop to the cart - A
removeFromCartmethod for removing items from the cart, back to the shop. ```dart ], 'cart items': [] };
/// [addToCart] adds items from the shop to the cart void addToCart(item) { allItems['shop items'].remove(item); allItems['cart items'].add(item); cartStreamController.sink.add(allItems); }
/// [removeFromCart] removes items from the cart, back to the shop void removeFromCart(item) { allItems['cart items'].remove(item); allItems['shop items'].add(item); cartStreamController.sink.add(allItems); } ...
Finally, we need to instantiate the bloc at the end of the file. Since we'd be using it in multiple screens, we won't want to instantiate twice.
```dart
...
  /// The [dispose] method is used
  /// to automatically close the stream when the widget is removed from the widget tree
  void dispose() {
    cartStreamController.close(); // close our StreamController
  }
}

final bloc = CartItemsBloc();  // add to the end of the file
Anytime we import this file, the bloc instance will be available to us.
Using our bloc in our pages
The shop_items.dart page
Navigate to the shop_items.dart page. First, import the BLoC class
import 'package:flutter/material.dart';
import 'package:shopping_cart_app/bloc/cart_items_bloc.dart';

...
Then, go to the ShopItemsWidget class and add the new code.
class ShopItemsWidget extends StatelessWidget {
  Widget build(BuildContext context) {
    return StreamBuilder(
      initialData: bloc.allItems, // The bloc was already instantiated.
      stream: bloc.getStream, // The stream we'd be listing to
      builder: (context, snapshot) {
        // snapshot contains the data of the bloc
        return  Center(child: Text("All items in shop have been taken"));
      },
    );
  }
}
We need a ListView.builder to generate ListTiles from our array of items.
...

Widget shopItemsListBuilder(snapshot) {
  return ListView.builder(
    itemCount: snapshot.data["shop items"].length,
    itemBuilder: (BuildContext context, i) {
      final shopList = snapshot.data["shop items"];
      return ListTile(
        title: Text(shopList[i]['name']),
        subtitle: Text("\$${shopList[i]['price']}"),
        trailing: IconButton(
          icon: Icon(Icons.add_shopping_cart),
          onPressed: () {
            bloc.addToCart(shopList[i]);
          },
        ),
        onTap: () {},
      );
    },
  );
}
We're done with the shop_items.dart
Unto greater things comrade.
The checkout.dart page
We've written most of the code. All we'd need to do is to copy code we've already written.
Naviagte to the checkout.dart page and import the BLoC.
import 'package:flutter/material.dart';
import 'package:shopping_cart_app/bloc/cart_items_bloc.dart'; // do as before
...
Then add the new content in the Checkout class.
class Checkout extends StatelessWidget {
  Widget build(BuildContext context) {
    return Scaffold(
      appBar: AppBar(title: Text('Checkout')),
      body: StreamBuilder(
        stream: bloc.getStream,
        initialData: bloc.allItems,
        builder: (context, snapshot) {
          return snapshot.data['cart items'].length > 0
              ? Column(
                  children: <Widget>[
                    /// The [checkoutListBuilder] has to be fixed
                    /// in an expanded widget to ensure it
                    /// doesn't occupy the whole screen and leaves
                    /// room for the the RaisedButton
                    Expanded(child: checkoutListBuilder(snapshot)),
                    RaisedButton(
                      onPressed: () {},
                      child: Text("Checkout"),
                      color: Theme.of(context).primaryColor,
                    ),
                    SizedBox(height: 40)
                  ],
                )
              : Center(child: Text("You haven't taken any item yet"));
        },
      ),
    );
  }
}
Finally, add the checkoutListBuilder
...
Widget checkoutListBuilder(snapshot) {
  return ListView.builder(
    itemCount: snapshot.data["cart items"].length,
    itemBuilder: (BuildContext context, i) {
      final cartList = snapshot.data["cart items"];
      return ListTile(
        title: Text(cartList[i]['name']),
        subtitle: Text("\$${cartList[i]['price']}"),
        trailing: IconButton(
          icon: Icon(Icons.remove_shopping_cart),
          onPressed: () {
            bloc.removeFromCart(cartList[i]);
          },
        ),
        onTap: () {},
      );
    },
  );
}
So, this is all for checkout.dart page. Technically, this is all for the app.
Verify that everything works in your emulator or device. If you get an error, check the error message printed on the console and start debugging from there.

Congrats for reaching the end.
What could we improve? For starters, you can rename the bloc object (instance of the CartItemsBloc class) to something more descriptive, like, cartItemsBloc. I named it bloc because this app is simple. If we were working with multiple BLoC classes, we'd have to be more descriptive in naming our variables.
I hope you've gotten the basics of Streams and the BLoC pattern. You can reach out to me on Twitter (do follow me) if you have questions, complaints or comments. You can also find all the code on GitHub. Thanks for coding along. ✨